BLK MAGIC
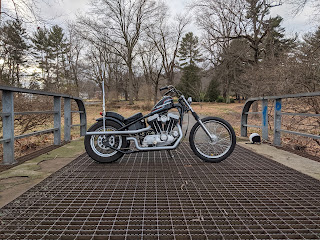
BUDGET BUILD-BLK MAGIC
Spin the record back, The purpose of this bike was to get acquainted with hardtailing a frame (haifley bros), spending as little money as possible, and a turn around when I sell it. All prerequisites went off without a hitch...a lot of time was spent on this project and you really cant get those hours back with pay especially when it comes to a sportster. So just factoring in material and not time.
With that being said the scales were already tilted in my favor on initial purchase. Bike was picked up from Eric Schiwe who wanted to unload it while it was sweating away in a connex box in Maplewood. He hadn’t ridden it much anymore as he picked up a shovelhead and preferred the latter. I was actually present when he bought the bike from an old timer. It had extremely low miles and we even did a compression test before picking it up. Fast forward to when i got it, 1500 bucks a sixer and a pack of smokes in exchange for a little crustified runner along with the haifley kit brand new in the box. How can you say no!?
It has saw life with 3 different paint jobs previous to me owning it. The first being its stock form, blue with gray two tone, sweet leaf (probably the nicest), and last, good ol Earnhardt, BLK Magic. This bike has no problem coming off the ground in first gear as long as you have a fat guy on the back and both got a good buzz going. Its been to Ohio and back with a girl I barely new at the time, which is the best way to ride two up, the relationship is so fresh they never complain. Even when you run out of gas 4 times, But the ride was everything.
I made time to tear it down and have a crack at it. As for the motor, i removed all loose chipped paint off the jugs and painted it with stock crinkle flat paint. All exposed aluminum got a muriatic bath with a scotchbrite finish. Measurements were made on frame (probably 5 times) and then i cut it. One thing that i do like to do is find a socket that'll fit in the ID of all the tubes, take some sand paper, tape it to the socket, and spin that baby with an impact to get any rust out where you plan on welding later. It'll also make fitment for the slugs easier. I had sourced square tubing from the local metal shop in Plainfield and assembled the jig. The jig is a kit from chop source and its definitely more than sufficient for the hobby builder.
The exhaust was made from some left over tight radiuses i had and left over straights. the only thing i had to purchase were the tips. Now being that it was on a budget i used VHT spray paint. For chrome i would've been looking at and extra 3-400 dollars. I had an idea in my mind for these and i wanted them to to be less cookie cutter than everyone elses pipes. Well that was definitely achieved love it or hate it, just feel something. I made the seat pan from 16 gauge sheet and handed it off to Diego aka Mr Comfy and let him roll with it. I know i wanted tuck and roll and i wanted the seat to be thick and comfy but not to comfy. The seat that it came with was to short leaving your balls to smack around on the top tube while your banging gears like any civilized sportster owner would do. The girls bikes are quick and don't forget it. He had the awesome idea of adding a gel layer for cushion and used both a paisley and smooth material to alternate for the tuck and roll design.
Was gonna run a spool and build a wheel for the front but the budget minded swooped in for the win. Whats better than a spool? A stock hub with shaved legs so you cant run a front brake even if you wanted to. I dolled up the front end and spent some hours on it, giving it a rebuild on reassembly. I also did my best to radius the trailer fender to hug that rear wheel better. The only way to make that thing stiffer was to let your step mom have at it.
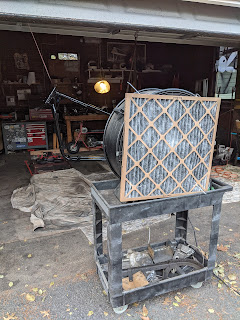
The paint booth. First time painting something and it might be my last. I set up a whole tent thinking it was gonna be awesome but didn't have enough moving air. All the paint orange peeled, had to rework it, made a call to the professional (Buddy Miller) just to be sure i'm doing it wrong and low and behold i was. Its great having friends that will tell you you're wrong, its even better when the have a solution. My next try was outdoors with a commercial fan sucking the fumes away and "laying it on wet". Frame and Oil tank came out well, the fender did not, which i had to spray for a third and final time.
The gas tank on this bike had cracked on the right side seam on 2 prior occasions. So it was now up to me to see if i could crack it again but first i would have to fix it. Cleaned up the area where it was, layed down some beads and gave it to Sean Rich to restore the damaged area. The lettering on this tank was hand done by a guy named Dinks who has come to been known as a legend in some circles. I wanted to retain this legends work and not fuck it up so i gave it to the most meticulous guy in New Jersey, Sean Rich. Luckily he made it as if nothing had ever happened.
Wiring i used all cloth from Wizard Wiring. Tacked some circuit breaker holders to the battery hold down and Voilà. Any replacement hardware i'll usually hit up a local Ace or True Value. These stores usually have a decent stainless steel section and i'm all over it. Handlebars are one piece with riser made by Front Street Cycle dressed up with biltwell single cable throttle and repop waffle grips. Spade sissy bar was purchased off a friend and i made taillight/plate mount and had them chromed along with sissy bar.
Thanks,
Rickels


Comments
Post a Comment